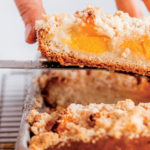
Peach Coffee Cake
This coffee cake can be made vegan and is similar to a German kuchen.
Servings: 1 12-by-17 inch coffee cake
Ingredients
Cake:
- 1 Goldenrod’s Favorite Bun Dough of your choice, plus appropriate flour for dusting
- Nonstick spray for pan
- 4 15-ounce cans sliced peaches in light syrup, drained completely
- 1 recipe Crumble Topping from The Original Crumble-Bun
Rich Bun Dough:
- 1 1/2 cups milk, almond milk or your favorite non-dairy milk
- 3/4 cups granulated sugar
- 2 tablespoons active dry yeast
- 1/3 cup vegetable oil
- 2 large eggs
- 1 teaspoon sea salt
- 4 1/4 cups all-pupose flour or 4 1/4 cups gluten-free all-purpose flour, plus appropriate flour for dusting
Crumble Topping:
- 2 cups all-purpose flour or 2 cups gluten-free all-purpose flour
- 1 cup granulated sugar
- 1 teaspoon pure vanilla extract
- 1/4 teaspoon sea salt
- 1/3 cup melted coconut oil or butter, or more as needed
Instructions
- Preheat your oven to 350°F and spray a 12-by-17-inch baking pan with nonstick spray.
- Roll out your choice of dough on a floured work surface into a rectangle that will fit the inside of your prepared pan. You want it to fit snugly into the pan, with a slightly raised edge all around. Arrange the drained, sliced peaches evenly across the dough. Sprinkle your crumble all over the top, making sure you cover the entire surface area. Let rise in a warm place for about 10 minutes, then transfer to your oven.
- Bake for about 50 minutes, until the edges are perfectly golden brown, the crumble is nice and golden, and the center doesn’t move when you gently jiggle the pan.
- Remove from the oven and let cool at room temperature. Serve warm or at room temperature. Store, covered, at room temperature for up to 4 days. If you have a lot of coffee cake left over, we recommend freezing it and reheating in the oven to enjoy.
Rich Bun Dough:
- Bloom the yeast: Heat your milk to about 110°F. Any hotter and you will kill your yeast; much cooler and your yeast will take a very long time to activate. It should be warm to the touch. Pour the warm milk into the bowl of a stand mixer and add your sugar and yeast. Use a handheld whisk to combine. I like to set the bowl on top of a preheating oven to bloom, but your counter is fine, too. This takes about 10 minutes.
- Mix the dough: Once the yeast has bloomed, add the oil, eggs and salt. Using a stand mixed fitted with a paddle attachment for gluten-free flour, mix on low speed to break up the eggs and to combine all the ingredients. If you're using traditional flour, switch to the dough hook attachment. Add the flour and mix on low speed until all the ingredients are combined and the dough has come together into a cohesive ball, 1 to 2 minutes.
- Gluten-free dough rises fairly quickly and is very tender, so you don't need to knead it or let it rise between mixing the dough and rolling our and shaping the final product. For traditional flour, you'll need to let the dough rise — there are many different approaches to this. I like to set the bowl of dough on top of a preheating oven. This works well and moves the process along pretty quickly. If you need to speed up the rise time, put a clean towel or some plastic wrap over the bowl to keep the dough warmer. You can also fill your sink with about 5 inches of warm water, cover the dough with a clean tea towel, and set the bowl in water. Your dough is ready to use when it looks as if it has doubled in size. When you press the dough a little, it should feel supple, soft, and have some more give. Yeast stays busy and dough rises when it is warm, so do your best to keep a warm environment for the dough as it rises.
- At this point, you are ready to make buns of your choosing.
Crumble Topping:
- Place all the ingredients in a large bowl and stir with a spoon. The fixture should feel fluffy, a little like wet sand, and hold together in small crumble chunks. Add more coconut oil as needed to make the crumble the texture of wet sand.
Notes
 Excerpted from Perfectly Golden: Adaptable Recipes for Sweet and Simple Treats. Copyright © 2020 Angela Garbacz. Photography by Daniel Muller. Reproduced by permission of The Countryman Press, a Division of W.W. Norton & Company. All rights reserved.